
A Step-by-Step Guide to Building Your Own Lightsaber
Ready to embark on your Jedi journey?
While you may not master all the Jedi rituals, you can craft your very own lightsaber from the comfort of your home.
How amazing is that?
Building a lifelike lightsaber at home is within your grasp in today’s tech-driven world.
So, are you up for the challenge of constructing your lightsaber?
Follow our guide designed for fans like you.
With a few simple steps and readily available lightsaber accessories, you’ll be well on your way to creating your lightsaber and embarking on your inaugural Jedi adventure.
Understanding Lightsaber Parts
To begin, familiarize yourself with the essential components of a lightsaber.
While real Kyber crystals may not exist in our world, you can still construct a lightsaber for friendly dueling and events.
These parts include –
- a lightsaber blade,
- hilt,
- emitter,
- electric board,
- soundboard,
- pommel,
- a battery.
- LED strips, and
These components are readily available at your local electronics store.
Building a Lightsaber Hilt
If you want to make a lightsaber hilt at home, you’ll need the following custom lightsaber accessories:
- LED Holder (used as an emitter)
- A 12-inch Chrome sink tube (1.5 inches in diameter)
- Two sink tube adapters
- A switch
- An endcap (pommel)
Attach one sink tube adapter to the LED holder and the second adapter to the pommel, securing them to either end of the sink tube.
It creates the basic framework of your lightsaber hilt.
Consider adding colors, accents, jewels, leather, and more to make it unique or themed.
For custom designs or holes in the steel sink tube, consult someone experienced with using a drill.
If you’re confident in your drilling abilities, you may need a Dremel and a file to perfect the hilt’s shape.
Lightsaber Electronics
Inside the lightsaber hilt, you’ll need a battery and an electronic board with all the necessary functions.
Ensure you have a round electronic board that fits comfortably inside the hilt.
Components like activation buttons, LED units, and momentary switches can be installed on it.
While optional, adding sounds to your lightsaber hilt, such as the iconic buzzing sound, can enhance the experience.
Consider obtaining a Baselit soundboard for additional background and clashing sounds.
Batteries
While you can use AA batteries, they don’t last very long.
Opt for lithium-ion batteries for long-lasting power and illumination.
Before installing electronics inside, properly insulate the hilt’s interior using materials like cardboard.
Ensure the electronic board and battery fit inside, but keep them out until you’ve completed your lightsaber blade.
Constructing a Lightsaber Blade
For a realistic lightsaber effect, you’ll need a blade that illuminates.
- Consider starting with a 40-inch polycarbonate tube (adjustable length).
- Use two LED strips, each measuring about two inches less than the tube length, to ensure a proper fit.
- Add a refraction film inside the tube and an end cap to cover the top.
- The refraction film enhances the light’s radiance, lending your lightsaber a more realistic appearance.
- Once your circuit board is ready, connect it with the LEDs and place them inside the refraction film within the tube. Proper knowledge of circuitry is crucial here.
- Finally, wire the electronics and battery inside the hilt, connecting the LED strips to the hilt’s electronics. Your lightsaber is now complete!
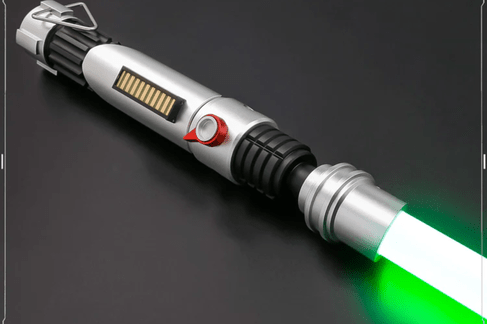
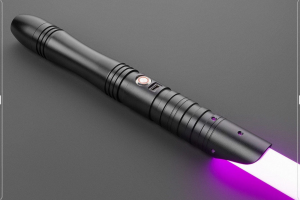
To determine the lightsaber’s color, select LED strips that match your desired hue.
Choose red LED strips for a Darth Vader lightsaber; for a Jedi lightsaber, opt for green or blue.
Many LED strips offer multiple color options, and you can even create a Neopixel blade at home.
Conclusion
Whether you choose to craft your lightsaber at home or embark on a Jedi quest at Disney, it’s time to kickstart your Jedi journey!